Add a Checklist
In LadVen OS, a checklist helps break a task into verifiable steps and understand progress quickly without reading the whole discussion. It is useful both when creating a task and when refining work later in the task card.
Use a checklist not as a second task description, but as a list of actions by which the result can be accepted.

The diagram shows the path from stages to verifiable items, proof files, and acceptance by progress.
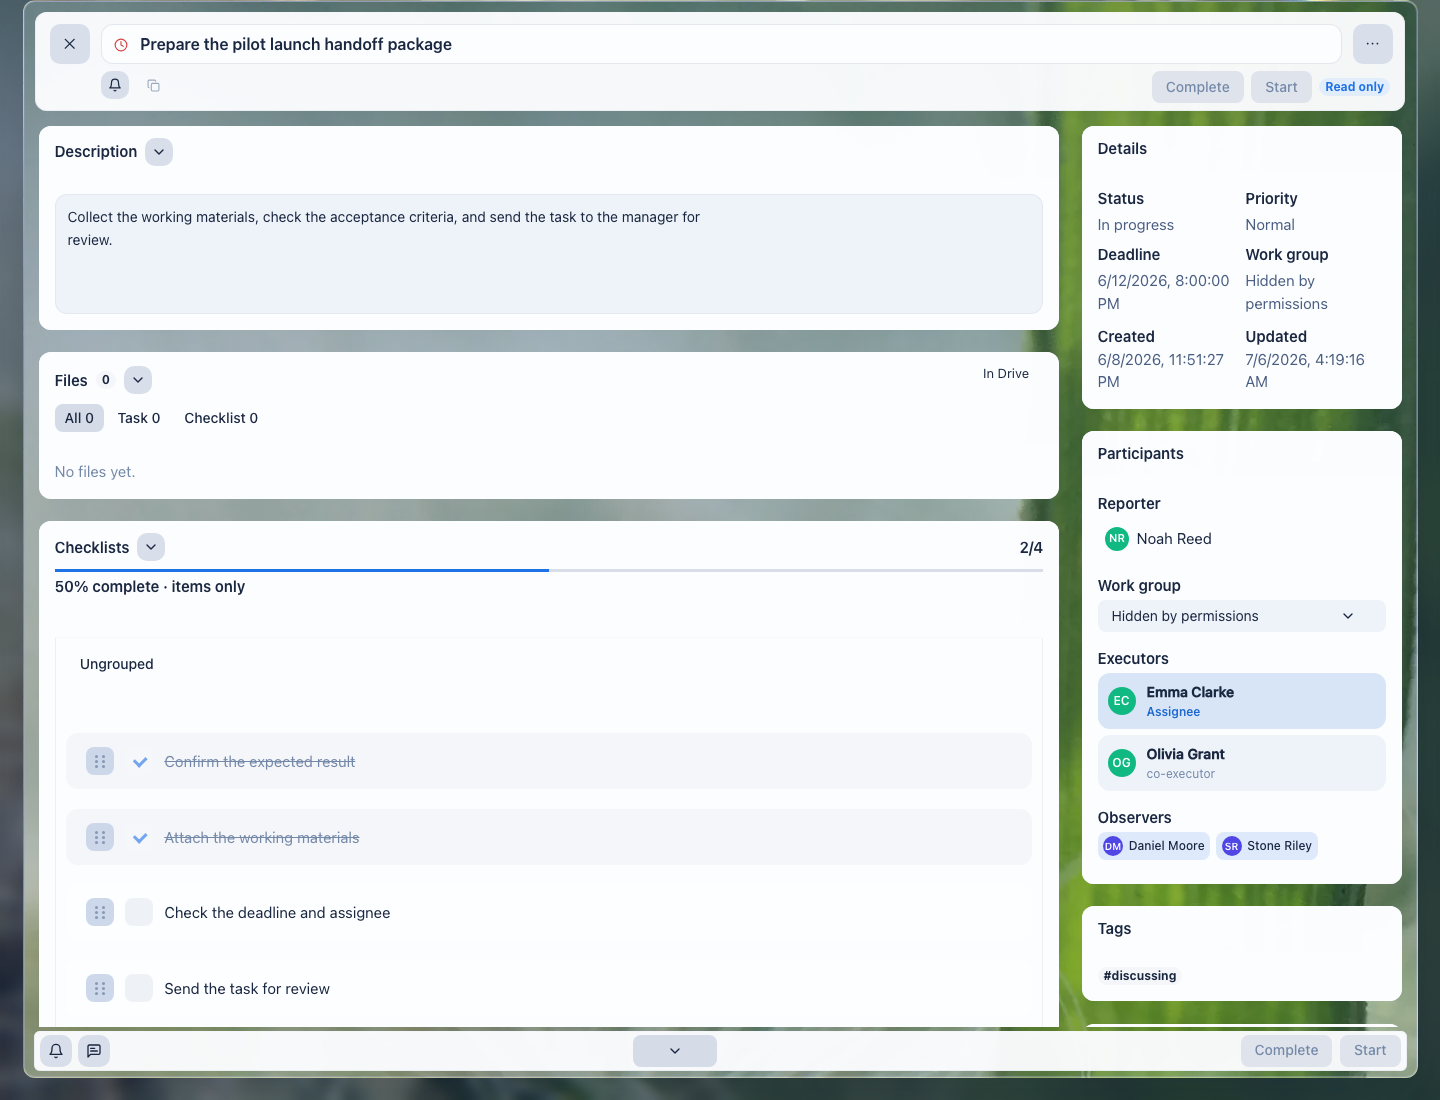
In a task card, the checklist shows completed and open items, overall progress, and the role boundary when the user can read the task but cannot edit its structure.
When to Use
Add a checklist if:
- the work repeats by a clear process;
- the result depends on several required steps;
- several participants execute the task;
- work stages need to be separated from discussion in comments;
- the task needs proof of completion: screenshots, documents, intermediate files.
If the task has only one obvious action, a separate checklist is usually unnecessary. It is better to describe the result in the task title and description.
For a manager, the checklist is especially useful where the task must be done the same way every time: launching a campaign, preparing a contract, accepting a layout, handing a client from one department to another, or closing a financial period. In such tasks, the checklist turns the manager's expectations into a clear order of work and reduces the risk that the assignee will miss a required step.
Do not use the checklist for thoughts, discussions, or long instructions. If you need to explain context, keep it in the task description. If you need to discuss a decision, use comments. The checklist should contain only actions that can be checked.
What a Checklist Consists Of
A checklist has several levels:
- checklist block with total progress: how many items are done out of the total;
- groups for work stages;
- items that can be marked as done;
- nested items for substeps;
- priority for an item or group;
- attachments for a specific item;
- numbering settings.
A group helps separate stages, for example "Preparation", "Approval", "Publication". Items inside a group should remain independent verifiable actions.
How to Add Items
- Open the task or create a new one.
- Go to the checklist block.
- Add the first item or group.
- Write the items in execution order.
- Add nested items if needed.
- Save changes or make sure they synchronized automatically.
An item should answer the question: "What exactly can be marked as done?" Good: "Check the client's legal details." Poor: "Check legal details, send the contract, and wait for a reply." In the second case, make three separate items.
Groups and Nesting
Use groups for large stages and nesting for substeps inside one result. Do not make the structure deeper than the assignee needs for work.
Good structure:
- group "Preparation";
- item "Collect source documents";
- nested items "Request contract", "Check legal details", "Attach final version".
Poor structure:
- a group for one item;
- nesting where each item depends on the neighboring item only visually;
- long wording that must be reread before marking the item done.
If an item can be completed independently, leave it on the same level as the others. If an item is proof or clarification for a step, make it nested.
Practical rule: one level is for the stage, the next level is for verifiable actions, and nested items are for clarifications or proof. If the manager has to open several levels to understand overall progress, the structure is too deep.
Two levels are enough for most tasks:
- group as the work stage;
- items inside the group as actions that can be completed and accepted.
Use a third level only when substeps really help avoid missing important details. For example, the item "Review the contract" can contain nested items "Check legal details", "Check payment terms", "Attach approved version". But if nested items become independent work for different people, move them to the main item level or create a separate task.
Numbering
Numbering helps in long and nested checklists: participants can refer to an item by number in comments and check the execution order faster.
Enable numbering when:
- there are many items;
- there are nested steps;
- the execution order matters;
- the checklist is used for result review.
For a short list of two or three independent items, numbering can be unnecessary. If the task has groups, check how numbering looks inside each group and in the root block without a group.
Item Priority
Not every item needs priority. Set high priority only for steps that block the result, deadline, or task acceptance.
Examples of critical items:
- review a legally significant document;
- get approval before sending something to the client;
- attach a file without which the task cannot be closed;
- complete a step on which another participant's work depends.
Do not raise priority on every item. If everything is marked as important, participants stop seeing truly critical steps.
Item Attachments
Files can be attached not only to the task as a whole, but also to a specific checklist item. This is convenient when a file proves completion of a particular step.
Attach to an item:
- a check screenshot;
- a signed or approved document version;
- a file with the result of a separate stage;
- an image or material needed only for that item.
Keep general task materials in task files, and point proof in item attachments. Then the reviewer does not need to search which file belongs to which step.
If there are several attachments, check that they can be opened, downloaded, and distinguished by name. For images, open the preview and make sure the needed area is visible.
How to Keep Order
A good checklist remains useful not only when it is created, but also during the work. Update it when the order of actions changes, a new required step appears, or part of the work is no longer needed.
Keep order this way:
- place items in the natural execution sequence;
- move new steps into the right stage instead of always adding them to the end;
- delete or rename items that no longer reflect the real work;
- do not mark an item done in advance;
- if an item is stuck, clarify the wording or add a nested substep with the delay reason;
- record important decisions in items, not only in comments.
For a manager, the checklist should answer three questions without an extra call: what is already ready, what blocks the result, and which proof can be opened for review. If the answers have to be searched manually in comments and files, the checklist needs to be cleaned up.
If part of the checklist becomes separate work, move or copy the needed group to another task instead of rewriting it by hand. Before moving, check that nesting, item importance, completion marks, and required files stay attached. Move a group when the work goes to another assignee; copy it when you need a repeatable template or a similar set of steps without losing the original history.
AI Draft
The AI assistant helps quickly assemble a checklist draft from text or an image. It is convenient when you already have a process description, email, screenshot, requirements list, or draft specification.
Working order:
- Open the AI assistant in the checklist block.
- Paste text or add an image.
- Start draft preparation.
- Review the suggested groups and items.
- Delete unnecessary items, rename unclear items, and only then apply the draft.
An AI draft does not replace human review. Before applying it, make sure the items are short, verifiable, and do not duplicate the task description. If the assistant could not confidently recognize the steps or returned an image warning, clarify the source text and run preparation again.
Do not put unnecessary client data, amounts, personal data, or internal links into the AI assistant if they are not needed for checklist items. Before applying the draft, remove private details from the items and leave only verifiable actions: what to do, where to check it, and what result counts as ready.
Saving, Synchronization, and Errors
When the checklist changes, the system can show intermediate states:
- item is saving;
- file is uploading;
- change is waiting for synchronization;
- an error occurred and retry is available;
- action is unavailable because of permissions.
Do not close the task immediately after adding large files: wait until upload is complete. If an item shows an error indicator, retry the action or check access to the task. If marking an item done fails, make sure the item did not remain completed only visually: after refreshing the task, the state should match the real result.
If you are editing an item's name and, without finishing the edit, perform a structural action on that item — move it into or out of a group, move it up or down, change its priority, or attach a file — the name text you entered is saved automatically before the action. The unfinished edit is not lost, but after the structural change still verify that the name, priority, and attachment belong to the right item.
In task creation mode, item attachments can upload after the task itself is saved. After creating the task, it is useful to open it and check that files ended up on the right items.
If a new task is restored from a browser draft, check the checklist separately: groups and items can come back, but local files on items must be selected again. Do not treat a restored file name as a ready attachment until, after saving the task, the file opens on the right item.
How to Work with Execution
Mark an item done only after the step is actually complete. If the task requires review, do not close it only because all items are checked: first make sure the result matches the task description and the required proof is attached.
If an item is worded too broadly, do not mark it partially. Split it into several steps and mark only the completed parts.
To discuss a specific item, quote the item in a comment. This lets participants see which step is being discussed without extra explanation.
A closed checklist is not the same as an accepted result. Before closure or acceptance, the manager checks not only percentages but also meaning: whether the result matches the task description, final files are attached, a final comment exists, and no new requests remain without a related task.
Use the checklist as an acceptance aid, not as the acceptance itself:
- the assignee checks that every completed item has a real result, and files or links open from the correct item;
- the reviewer checks critical items against the task description and final comment;
- the manager or process owner checks that blockers, limits, and new requests are visible as comments or related tasks, not hidden inside completed items.
If all items are closed but the final file is not attached or the comment does not explain a limitation, it is better not to accept the task silently. Ask the assignee to add proof or record the new scope in a separate related task.
Examples of Working Checklists
For a simple execution task:
- get source data;
- prepare the result;
- attach the final file;
- send for review.
For a task with acceptance:
- group "Preparation": collect materials, check access, clarify acceptance criteria;
- group "Execution": do the work, attach intermediate proof, fix comments;
- group "Acceptance": attach the final result, get confirmation, close the task.
For a cross-department task:
- group for the department that prepares source data;
- group for the department that does the main work;
- group for the department or manager who accepts the result.
Do not turn these examples into a rigid template for all tasks. The purpose of the checklist is to make specific work transparent, not to fill the card with identical formal items.
Good Practices
- Keep items short and verifiable.
- Use groups for stages, not decorative separation.
- Leave the root block without a group for single or quick items.
- Enable numbering for long and nested lists.
- Set high priority only for critical steps.
- Attach proof to a specific item, and keep general materials in task files.
- Before applying an AI draft, remove unnecessary and vague items.
- Do not hide important decisions only in comments: if a decision affects execution, add or update an item.
What to Check After Saving
- total progress shows the correct number of done and total items;
- groups expand and collapse as expected;
- nested items are under the right parent item;
- numbering does not break the reading order;
- priorities are set only where they are really needed;
- files open on the right items;
- there are no loading or error indicators;
- after restoring a draft, local item files were selected again;
- after refreshing the task, the checklist kept its structure and completion marks.
Common Mistakes
Duplicating the task description. A checklist should show execution steps, not repeat a long description.
Mixing several actions in one item. If an item cannot be clearly marked done, split it.
Creating overly deep nesting. The assignee should quickly understand the next step without reading the tree as an instruction.
Using groups without meaning. A group is for a stage or logical block, not visual decoration.
Attaching all files to the task when they relate to different steps. Proof for a specific action is better kept in item attachments.
Applying an AI draft without review. An automatically created list can contain unnecessary, repeated, or too-general items.
Ignoring synchronization errors. If a change was not saved, participants will see an outdated checklist and may accept incorrect progress.
How to tell that a checklist is ready to use
A checklist is ready to use when it helps the assignee move through the task and lets the reviewer understand real progress quickly. It should have meaningful stages or groups, verifiable items, responsible actions, and proof on the items where the result cannot be accepted without a file or link.
Check: the empty block does not hide required steps; groups represent work stages, not decoration; nested items do not turn the list into a hard-to-read instruction tree; numbering is enabled only when order matters; a high-priority item really affects acceptance; the file is attached to the right item instead of being lost among general task materials; the AI draft has been reviewed and cleaned of duplicates; synchronization or upload errors are resolved before participants start working from the list.
Separately check that the participants who must complete items or review proof can see the task and open the needed files or links. Otherwise the checklist may look ready, but the result is not ready for acceptance.